Visibility is one of the greatest assets in our toolboxes as engineers.
Recently I went down the rabbit hole of configuring the Zabbix agent on a few of the FreePBX instances I manage for some contract customers.
Finding quality documentation surrounding FreePBX Asterisk Manager Users configuration wasn’t great.
That can be said about a lot of the FreePBX documentation though, can’t it? Half the articles are dead.
Thank you, Internet Archive, for saving me so often.
Anyway, I did manage the find okay documentation on Sangoma’s Wiki, but it didn’t contain much useful information.
I found Omid Mohajerani’s GitHub after some late-night Google-Fu’ing and I got to say, he puts together some great little articles relating to SIP.
Anyway, a mix of my own experience and implementing the steps on Omid’s guide resulted in this guide.
Configuring the Zabbix Agent
I am using Zabbix Agent 2, your configuration steps may vary if you are using 1.
Login to your SSH Server
Install the Zabbix2 agent
yum clean all
rpm -Uvh https://repo.zabbix.com/zabbix/6.4/rhel/7/x86_64/zabbix-release-6.4-1.el7.noarch.rpm
yum install zabbix-agent2 zabbix-agent2-plugin-*
systemctl restart zabbix-agent2
systemctl enable zabbix-agent2
Configure the Zabbix Agent
Open the Zabbix Agent configuration file and modify the Server field to be the IP address of your Zabbix Monitoring Host, the Hostname field set to your FreePBX server’s DNS name, and the RefreshActiveChecks field to how often you want ActiveChecks to run, if you want active checks.
nano /etc/zabbix/zabbix_agent2.conf### Option: SourceIP
# Source IP address for outgoing connections.
#
# Mandatory: no
# Default:
# SourceIP=
##### Passive checks related
### Option: Server
# List of comma delimited IP addresses, optionally in CIDR notation, or DNS names of Zabbix servers and Zabbix proxies.
# Incoming connections will be accepted only from the hosts listed here.
# If IPv6 support is enabled then '127.0.0.1', '::127.0.0.1', '::ffff:127.0.0.1' are treated equally
# and '::/0' will allow any IPv4 or IPv6 address.
# '0.0.0.0/0' can be used to allow any IPv4 address.
# Example: Server=127.0.0.1,192.168.1.0/24,::1,2001:db8::/32,zabbix.example.com
#
# Mandatory: yes
# Default:
# Server=
Server=**.**.**.**
### Option: Hostname
# List of comma delimited unique, case sensitive hostnames.
# Required for active checks and must match hostnames as configured on the server.
# Value is acquired from HostnameItem if undefined.
#
# Mandatory: no
# Default:
Hostname=YourHostName.Domain.TLD
### Option: HostnameItem
# Item used for generating Hostname if it is undefined. Ignored if Hostname is defined.
# Does not support UserParameters or aliases.
#
# Mandatory: no
# Default:
# HostnameItem=system.hostname
### Option: HostInterfaceItem
# Optional parameter that defines an item used for getting host interface.
# Host interface is used at host auto-registration process.
# During an auto-registration request an agent will log a warning message if
# the value returned by specified item is over limit of 255 characters.
# This option is only used when HostInterface is not defined.
#
# Mandatory: no
# Default:
# HostInterfaceItem=
### Option: RefreshActiveChecks
# How often list of active checks is refreshed, in seconds.
#
# Mandatory: no
# Range: 1-86400
# Default:
RefreshActiveChecks=20
### Option: BufferSend
# Do not keep data longer than N seconds in buffer.
#
# Mandatory: no
# Range: 1-3600
# Default:
# BufferSend=5
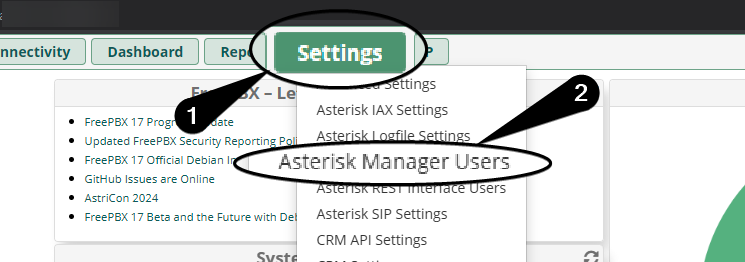
Configure the Asterisk User Manager
Login to the FreePBX portal and configure a user for Zabbix to use against the Asterisk API.
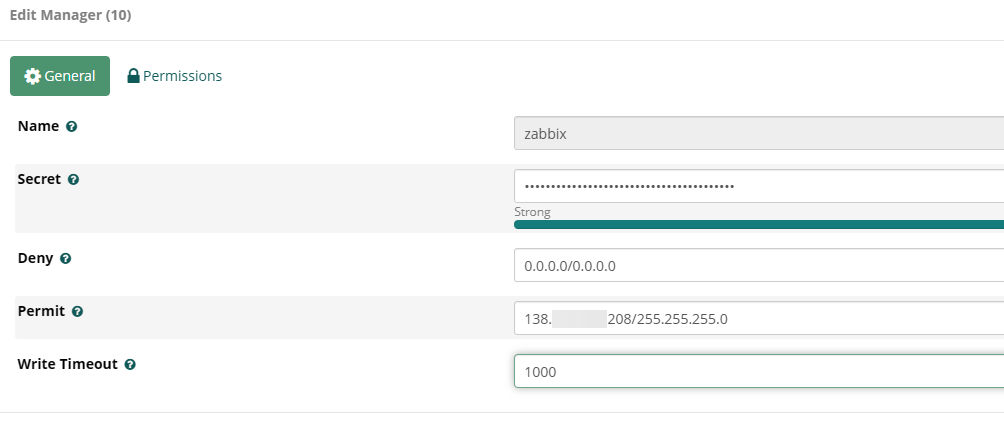
name to whatever you prefer, I used zabbix.Set the
secret to something long and secure.Leave
deny as is.Configure
permit to be the IP of your Zabbix monitoring server.IP format xxample
101.101.101.101/255.255.255.0If you wish to specify multiple IP addresses, use the
& symbol.Multiple IP format example:
101.101.101.101/255.255.255.0&202.202.202.202/255.255.255.0You do not have to modify
Write Timeout, for my testing I configured 1000.Configure Asterisk AMI
Confirm you see Manager (AMI): Yes and TCP Bindaddress: 0.0.0.0:5038.
If either of the above values are missing continue in this section – otherwise you can skip this.
[root@********* sangomartapi]# asterisk -r

***********CLI> manager show settings

Global Settings:
----------------
  Manager (AMI):             Yes
  Web Manager (AMI/HTTP):    Yes
  TCP Bindaddress:           0.0.0.0:5038
  HTTP Timeout (seconds):    60
  TLS Enable:                No
  TLS Bindaddress:           Disabled
  TLS Certfile:              asterisk.pem
  TLS Privatekey:
  TLS Cipher:
  Allow multiple login:      Yes
  Display connects:          No
  Timestamp events:          No
  Channel vars:
  Disabled events:
  Debug:                     No
Modify /etc/asterisk/manager.conf and ensure it appears as follows.
;
; AMI - Asterisk Manager interface - Generated at 2023-06-20T20:34:11+00:00
;
; FreePBX needs this to be enabled. Note that if you enable it on a different IP, you need
; to assure that this can't be reached from un-authorized hosts with the ACL settings (permit/deny).
; Also, remember to configure non-default port or IP-addresses in amportal.conf.
;
; The AMI connection is used both by the portal and the operator's panel in FreePBX.
;
; FreePBX assumes an AMI connection to localhost:5038 by default.
;
[general]
enabled = yes
port = 5038
webenabled = yes
bindaddr = 0.0.0.0
displayconnects=no ;only effects 1.6+

[admin]
secret = **********************
deny=0.0.0.0/0.0.0.0
permit=127.0.0.1/255.255.255.0
read = system,call,log,verbose,command,agent,user,config,command,dtmf,reporting,cdr,dialplan,originate,message
write = system,call,log,verbose,command,agent,user,config,command,dtmf,reporting,cdr,dialplan,originate,message
writetimeout = 5000

#include manager_additional.conf
#include manager_custom.conf
Reload Asterisk and the Zabbix Agent
fwconsole reload
systemctl restart zabbix-agent2
Import the Asterisk by HTTP Zabbix Template
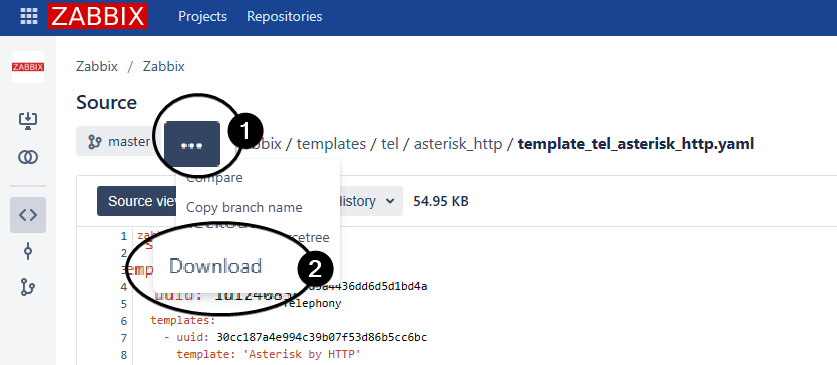
...Select
Download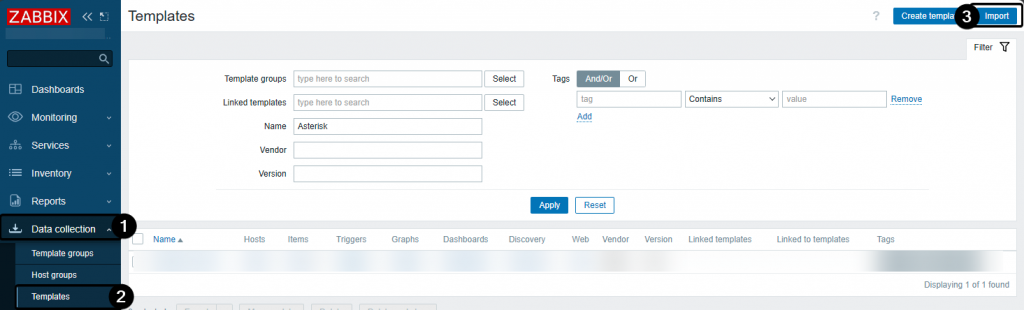
Data collectionClick
TemplatesSelect
ImportUpload the previously downloaded XML file:
template_tel_asterisk_http.yamlConfigure the host in Zabbix
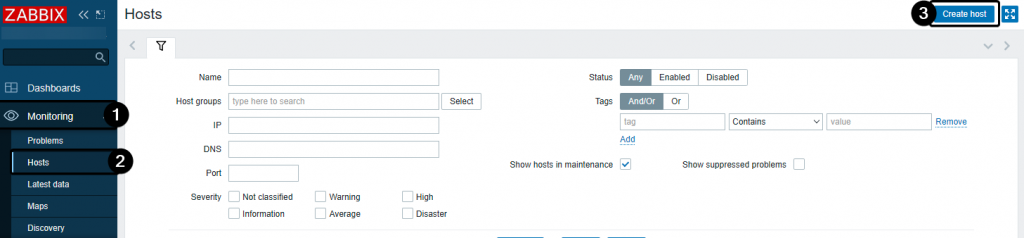
MonitoringSelect
HostsClick
Create host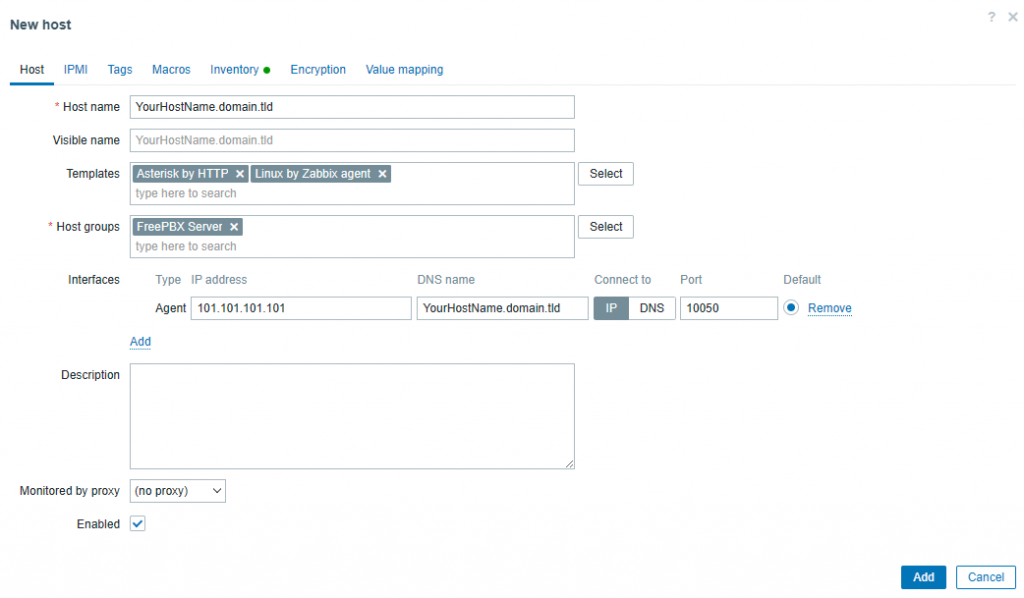
Host name as the domain that points to your FreePBX server.Configure
Templates to include Asterisk by HTTP and Linux by Zabbix agent.Configure
Host groups as you see fit, I have a host group specific to FreePBX servers.Add an
Interface and set the IP address to your FreePBX server’s IP and DNS name to the domain that points to your FreePBX server.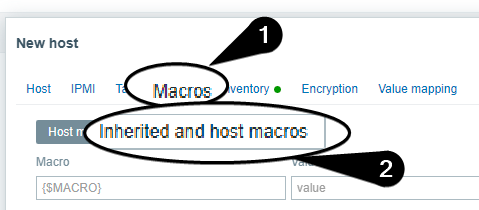
Macros tabSelect
Inherited and host macros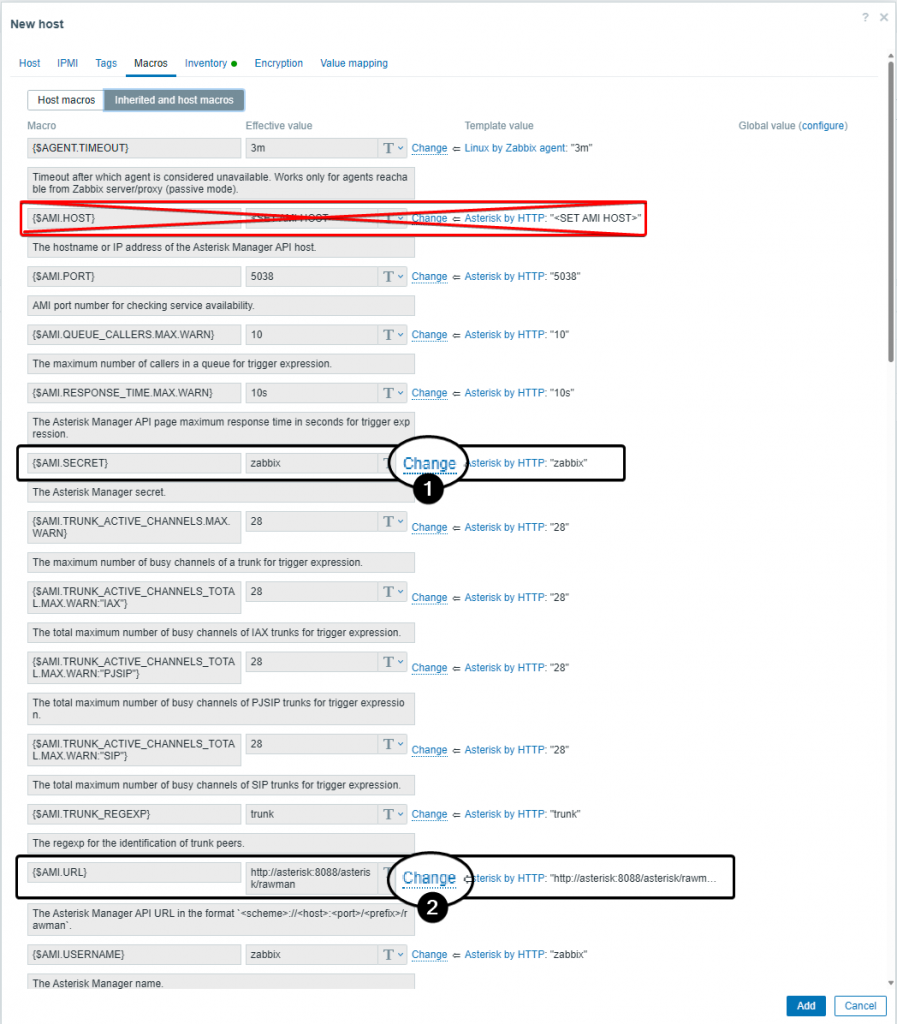
{$AMI.SECRET} as the password you configured for your Asterisk Manager UserConfigure
{$AMI.URL} as http://your_freepbx_url:8080/rawmanConfigure
{AMI.HOST} only if you want the Asterisk service checked, the Asterisk service is set to disabled in the FreePBX distro.Confirm Asterisk AMI Monitoring
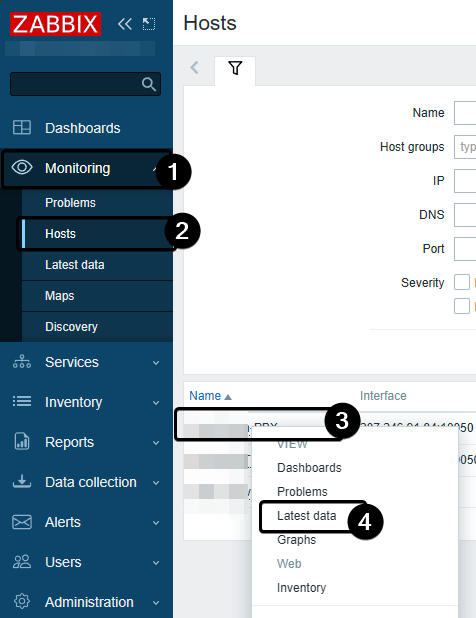
MonitoringSelect
HostsClick your host
Select
Latest data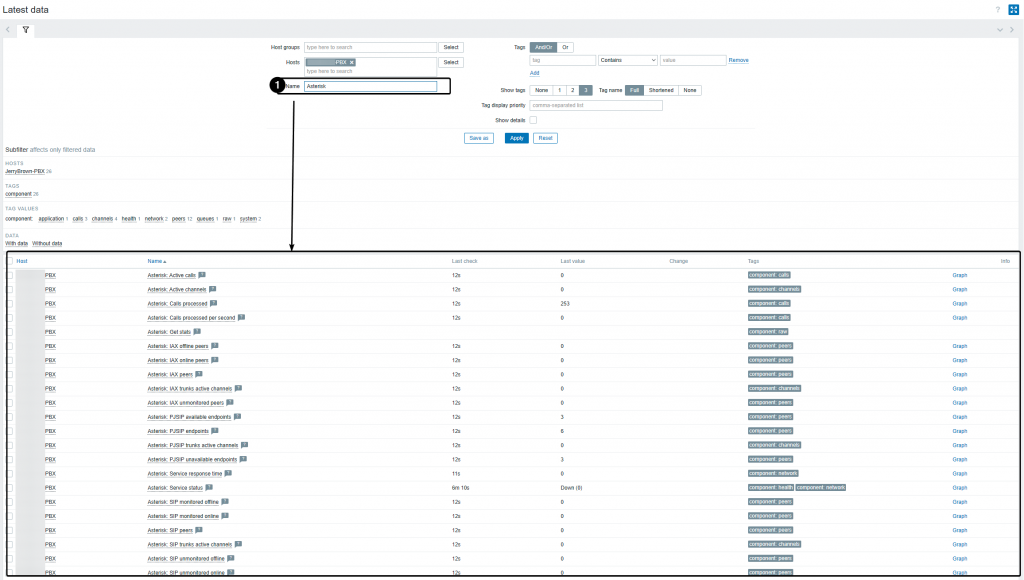
Before you go!
If you run into an issue such as you provided the wrong URL or credentials, make sure to restart the Zabbix server. Sometimes, Zabbix may hold onto old configurations in its cache. Restarting the Zabbix server can help clear this cache.
sudo systemctl restart zabbix-serverChecking the Zabbix logs is always a great step as well.
sudo tail -f /var/log/zabbix/zabbix_server.log